Methodology
Principles
Version Control
Everything is version controlled. Anything not checked into git does not
exist.
Golden Main
The main branch of the Kirsch repository is golden.
It must
Always build
be kept in pristine condition
CI
The authoritative check for whether the main branch or any derivation
thereof is golden or not are the results of the CI runners on gitlab.
Tests
Tests are what determine whether any functionality is implemented and working properly.
You must implement tests that cover important functionality of your features that will fail if the feature is broken by a change. The more other code relies on your code working correctly, the better it should be tested to ensure that it does.
Culture & Interactions
Kirsch is a group project. Before you rush off to implement something, talk to people! Write a description of what it is you’ll implement, how it will affect Kirsch.
Workflows
Starting Development
Note
Please merge or delete all branches as soon as they are not needed anymore.
The first step is to clone the official repository.
git clone git@gitlab.inf.ethz.ch:project-opensockeye/kirsch.git
Now that you have your local copy of the repository, it’s time to create a
feature-branch. A feature branch splits off from main, has commits added to
it until the feature is complete, and is then merged back into main. Kirsch
uses feature branches to enforce that the main branch remains pristine and
always reflects a complete, running version of Kirsch. Additionally, Kirsch uses
merge requests so that every line of code added to Kirsch passed CI, and had a
second pair of eyes check code quality and documentation.
You can create a local branch and check it out simultaneously with the same
command by passing -b to git checkout:
git checkout -b $new_branch
Alternatively, you can create a branch
git branch $new_branch
And then switch to it
git checkout $local-branch
git checkout is also how you can switch to a branch that only exists remotely in
the repository.
It is good practice to regularly commit to a branch while developing, but also
to regularly push your updated branch to the repository. You can tell git
explicitly which remote branch to push to every time, but it is more convenient
to set up a tracking branch on the remote for your local branch.
For a local branch that does not track a remote branch yet, you can tell git
to push to a new upstream branch that tracks the local branch by passing -u
origin to git push:
git push -u origin $local_branch
For any subsequent push-es you can then call git push without any
arguments and git will automatically push to the remote tracking branch:
git push
During Development
Warning
It is expected that your feature is implemented in readable, maintainable code. Your additions must also be reflected in this Kirsch Handbook! Follow the same development patterns for adding to the Handbook as you would for Kirsch itself, so create a feature branch, make a merge request, …
While developing your feature, it is good practice to regularly commit your changes both to your local feature branch as well as the pushing them to the upstream branch.
Because your feature branch will eventually be merged back into main it is
imperative to synchronize your feature branch with main regularly. This will
make the final merge significantly easier.
The safest way to pull those changes is to rebase new commits onto your
feature branch:
git rebase origin/main
The git rebase command will re-base the root of your changes on top of the
head of the branch you’re pulling from. rebase literally re-applies the
commits in the same order on top of the head commit of the other branch, which
means that it re-writes the git history. This results in a clean commit
history that is easier to read and a lot easier to bisect than one with many
merge commits.
rebase is preferable whenever the branch you’re rebasing is a local copy
of a remote branch.
Rebasing two branches that are both remote (like rebase-ing a feature branch
you share with someone else on top of main) is trickier. Because the git
history is re-written by rebase, if you push a rebased feature branch it
will be inconsistent with the versions that your teammates may have checked out
locally.
Warning
Don’t rebase two remote branches without coordinating with whoever
you’re working on the branch!
For more information on rebase see this explainer.
Also see Julia Evans’ blog for more in-depth Git knowledge on rebasing, confusing git terminology, and general git knowledge.
Adding changes back into main
Once you’re happy with the state of your feature, have added documentation and
tests that cover your additions, you’re ready to merge your feature branch back
into main. Your feature branch is deleted in the process, and you’ll create a
new branch if you develop a new feature.
Kirsch follows a merge-based development workflow. This means that you’ll create
a merge request that at least one other member of the team has to properly
vet and approve.
For features that require updates or additions to the Kirsch handbook (as
decided by you and your reviewer), you’ll open two merge requests: One for
the handbook additions, and one for Kirsch code. In both merge requests
you’ll refer to the other and they will only be approved and merged in tandem!
First, you must push your feature branch (or the changes you have made to it) to the repository
git push -u origin $local_branch
You can then either create a merge request using the web-interface or use
git push options
in your CLI.
Web merge request
If you just pushed a branch, GitLab will helpfully display a notification to create a merge request:

The notification to create a merge request. In this case in the Kirsch
Handbook repository for feature branch development-intro. The notifcation
is preferable, as it pre-selects the branch to merge.
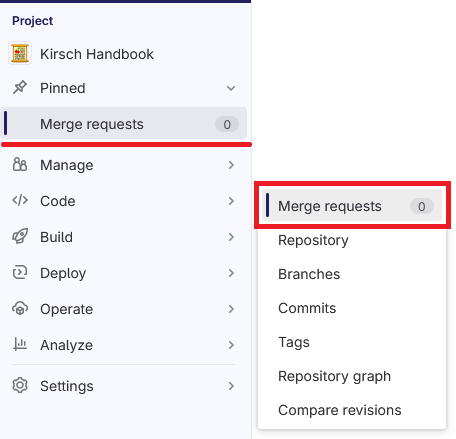
You can also create a merge request by accessing the sidebar, then the </>
Code menu, and clicking the Merge requests option.

The sidebar and menu item to access the merge request page.
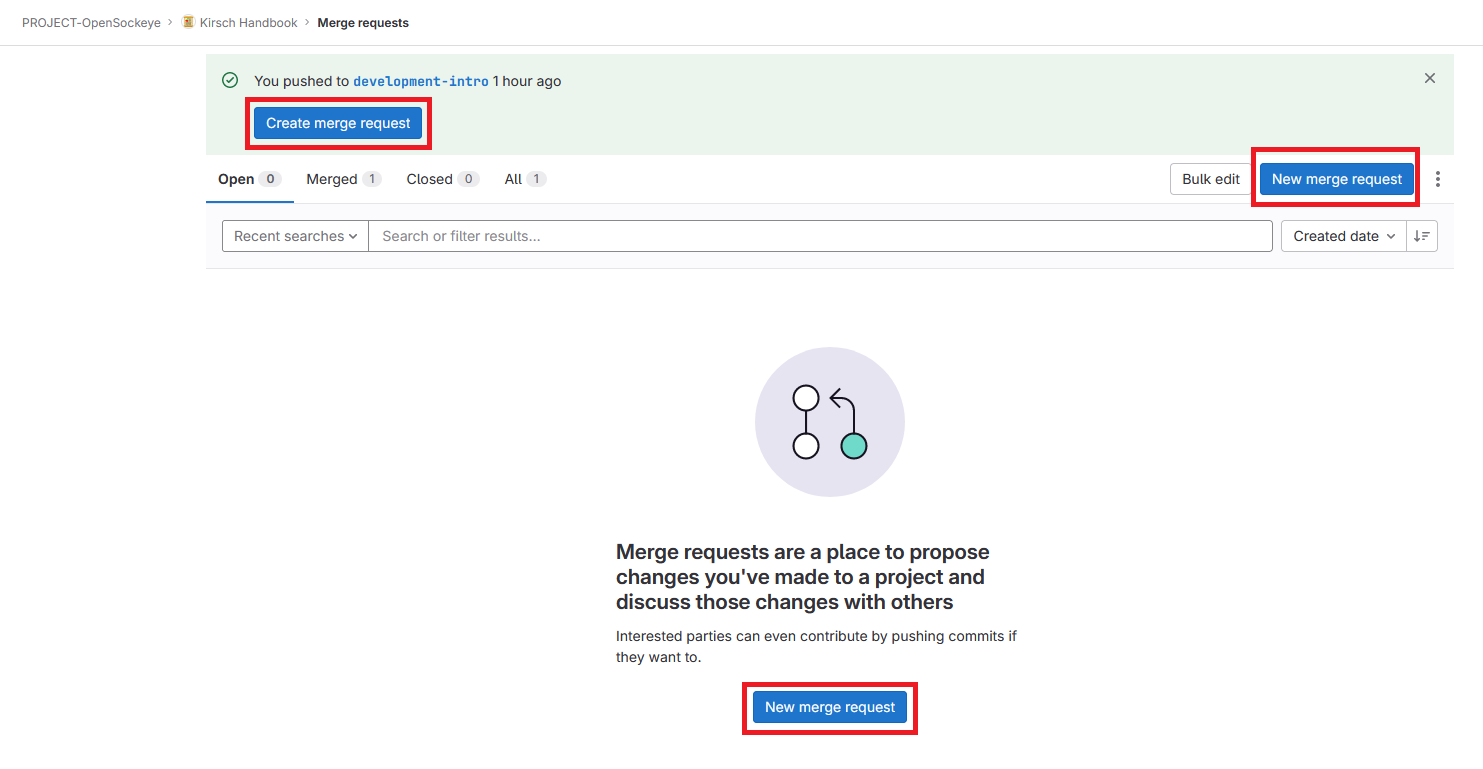
In this instance, the Merge requests page actually offers three choices for
the same button to click to create a new Merge requst.

The Merge requests page with three options to create a merge request.
The notifcation is preferable, as it pre-selects the branch to merge.
If you did not use the Create merge requests notification but clicked another
button, then you must now select your feature branch as the Source Branch.
In this example, the Source branch is development-intro and the Target
branch is main.

The New merge request page with a feature branch called development-intro
that should be merged into main.
The next step is to write the actual merge request. Merge request have:
A Title
A Description
One Assignee, usually the person who creates the merge request, who is working on getting the request approved and merged.
One Reviewer who approves the merge request once it meets the project standard.
A Squash commits option. Squashing turns the potentially many commits of your feature branch into one commit that has the same title as your merge request.
Various other options that are not relevant for Kirsch at this stage. Please leave them as default.
Write a Title in the style of a Commit message: “Add support for X”, “Refactor subsystem Y”, …
You can also mark a Merge request as a Draft. This blocks merging it until it is marked ready. Use this if you want to open a request but don’t want to merge it immediately.
Write a Description that summarizes your changes. Include a link to the merge request for the Kirsch Handbook in your Kirsch Merge Request and vice-versa. (You’ll have to edit one of the descriptions after creation.)
Under almost all circumstances, you should enable Squash commits. The only exception is if you are merging a big feature with a clean commit history that would make it easier to debug later on.
Warning
If you disable Squash commits, note this in the Description!
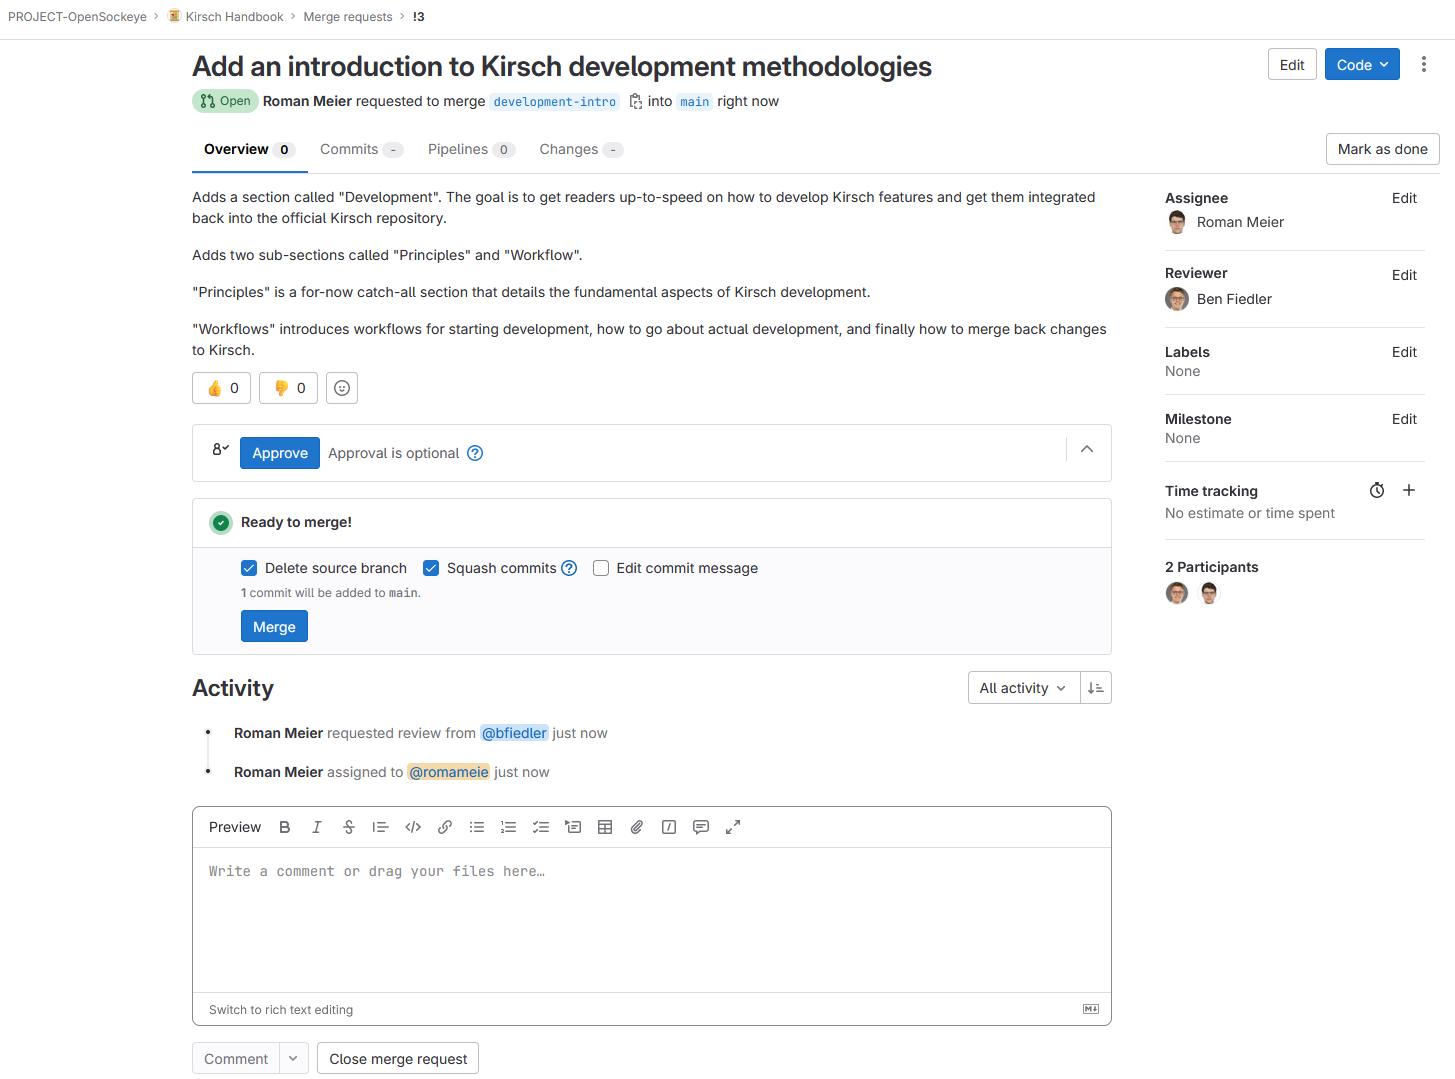
Once you have created your Merge request you’ll see an overview page for the request where you can wait for approval by the Reviewer and discuss your changes. You’ll also see here whether the final CI pipeline check passed or not.
Note the Commits and Changes tabs next to the selected Overview tab. There you can review your commits, as well as look at the changes they introduce. For the code changes, you can even add comments to particular lines of code that will show up in the Overview.

A Merge request before approval. You can comment and discuss the merge request.
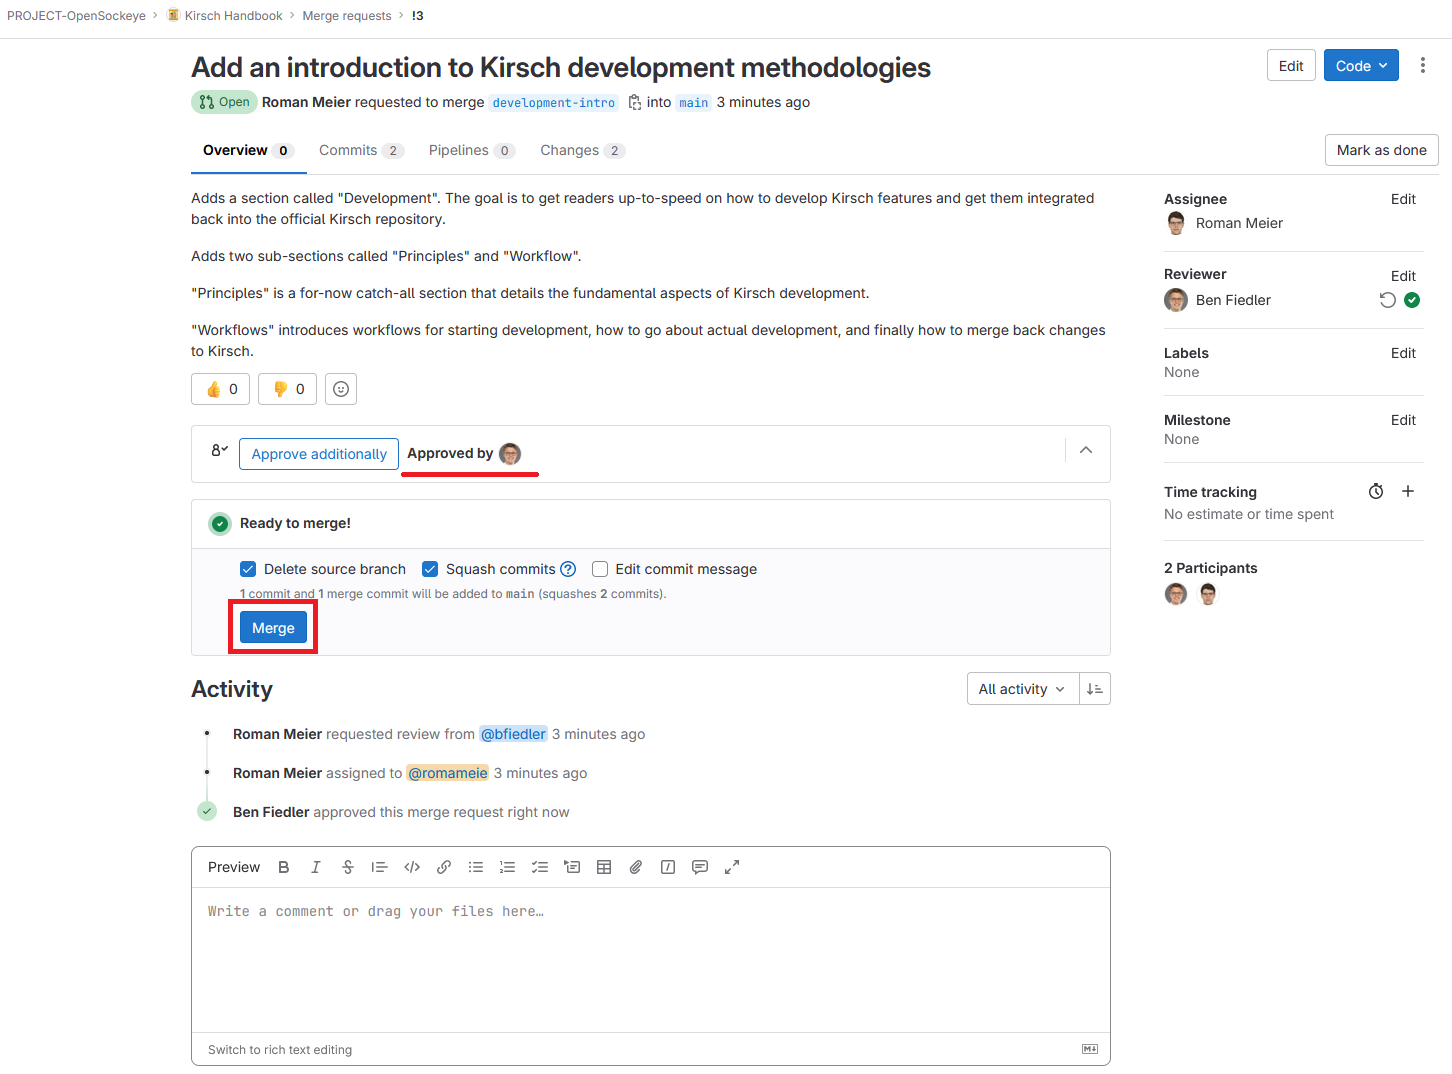
Once the Merge request has been approved, you can merge it if the Reviewer hasn’t done that already:

A Merge request thas has been approved by our colleague. :) You can now Merge the request, if the Reviewer hasnt’t done so already!
And finally your work is complete! Your feature has been merged and you can start the cycle anew by creating a new feature branch.
CLI merge requests using git push options
You can also use the CLI and git push options as detailed in the GitLab documentation.
See How to write a merge request for the expected contents of the various fields.
Iterating on a merge request
It is likely that you’ll get feedback on your merge request and will have to make some changes.
git makes this very simple: You add your changes locally, commit them to
your feature branch, and push the branch.
The merge request will automatically be updated.
If you added more functionality and code you should point this out to your Reviewer using a code comment you add in the web interface at the appropriate location.
Step-by Step
Rebase back onto
mainEnsure that CI pipline succeeds
Create a merge request and select an appropriate reviewer
Wait for the reviewer to
approveyour changes.The reviewer merges your changes. Your feature is now part of Kirsch!